Our Pro Tip: The Essential Steps for Designing Effective Wireframing and Prototyping
Why is it effective to use wireframing and prototyping?
Wireframing and prototyping are crucial stages in the design process, and Figma is a powerful tool that can help you create professional-quality wireframes and prototypes for your projects. We recommend starting with simple wireframes that focus on layout and functionality. This will help you to quickly test different ideas and get feedback on the overall structure of your interface. We also suggest using a consistent grid to create a consistent layout and ensure that all elements are aligned correctly.
Help your team figure out and improve the scope of work
Wireframes let designers quickly make a picture of what the final product will look like and show it to the team for feedback. Wireframes also help us see which screens the app will have, what will be on each screen, and how everything will work together. Plus, looking at wireframes is much faster than reading specs. It also helps us make sure the initial estimates are the same as the final ones.
Include everyone on the team when designing the product
We all have faced the challenge of creating a great design, only to run into development limitations. Wireframes let us get developers involved in talking about designs early on, which lets them give feedback and suggest changes before starting on the visual design. This saves time and money.
It's best to keep it simple and not add too many details or design elements to the wireframes. The aim of wireframing is to create a basic representation of the interface, not a complete design. It is also a good idea to add notes to explain what different elements do and how they will work.
Organize a demonstration for clients
Getting quick responses from your customers and people with an interest in the project is an important part of designing. We've all had occasions when our stakeholders asked for revisions, and that's okay. Wireframes can make this process more effective. Making changes to prototypes takes more time and work than making changes to wireframes, so you can be more flexible and avoid wasting extra time on redoing things.
Do user testing
We recommend testing with users to see how they interact with your interface and identify any issues that need to be addressed—no one wants to release an app and find out that users don't understand it. Wireframes can help designers get feedback from users without having to make complex prototypes. And also use Figma's collaboration feature to allow multiple people to work on the wireframe simultaneously, and make comments and suggestions. This can help speed up the design process and ensure that everyone's ideas are considered.
But, to do it right, designers should follow the best practices.
However, it's important to follow best practices to ensure that your wireframes and prototypes are practical and user-friendly. In this article, we'll discuss some best practices for wireframing in Figma.
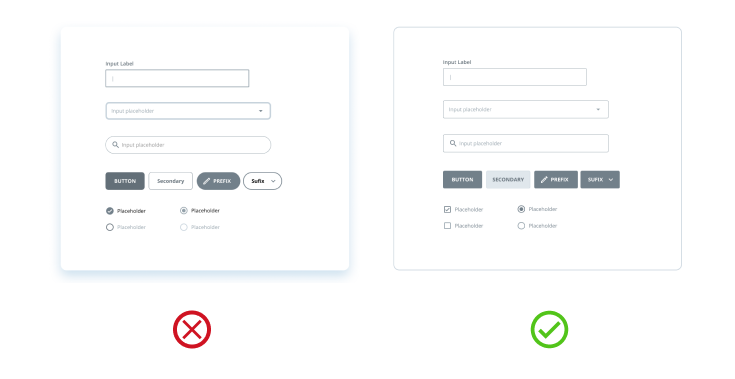
#1: Reduce the Use of Color in Wireframes
If you are adding lots of colors to your wireframes, remember why you are doing it - to show the elements and how they interact. Ask yourself if more colors help you reach your goal.
In some cases, it is possible to add colors to wireframes. However, this can be distracting to viewers and make future updates more difficult. Additionally, it is important to consider that not all clients have a good understanding of UX techniques, and may interpret colored wireframes as final designs.
Although black and white is the traditional palette for wireframes, there are times when using color is appropriate. For instance, you can use red to indicate error states, blue to denote notes, and so on.
#2: Keep component designs simple
When adding components to your wireframes, opt for basic designs. Wireframes are not meant to contain highly designed and detailed components; rather, they should be easily recognizable by your team and stakeholders. Investing time and effort into detailed components will not be particularly useful.
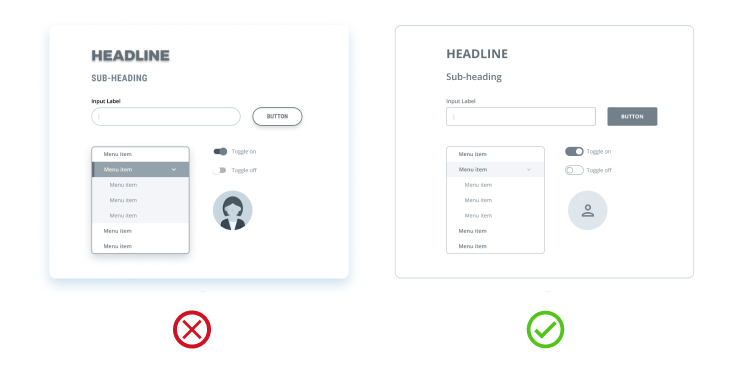
#3: Stay consistent
When creating wireframes, it is important to ensure that similar components have the same design. If components appear different, developers may question if they are the same, and this could lead to additional time being added to the estimates. To avoid confusion, remember to be consistent in your designs.
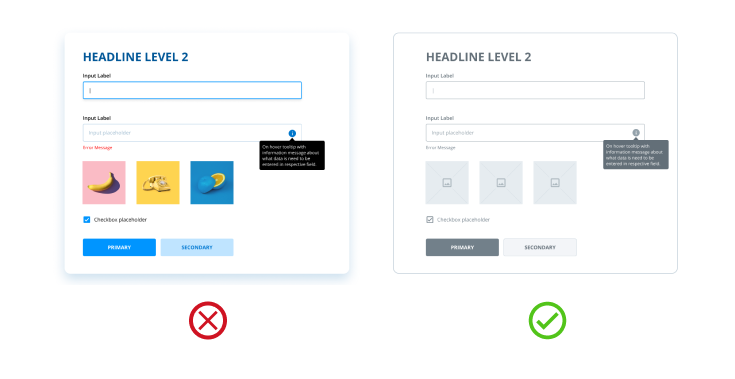
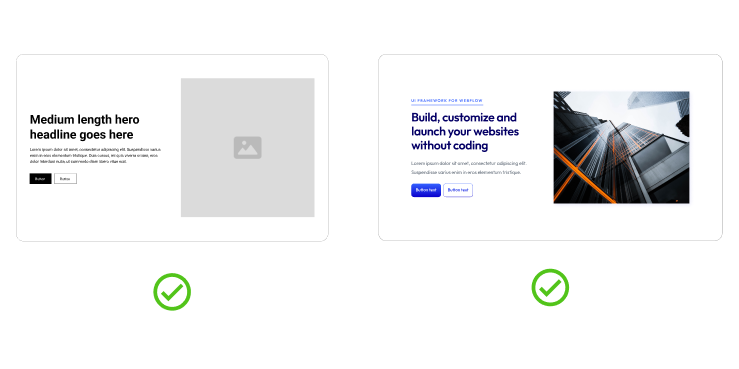
#4: Use actual content
UI/UX designers often mistakenly use lorem ipsum instead of real content in their wireframes. They may argue that the content isn't available yet, but a draft version can be used instead. Few designers are even aware they are making this mistake.

Content influences the design you'll create, and the draft content will help you make the right decisions and deliver an excellent design. Using lorem ipsum, however, won't give you a full picture and will likely require many adjustments to the UI, or even worse — create a design that doesn't work. Additionally, real content will add value to your wireframes, explain the context better, and may even suggest that you should start collecting the real content now.
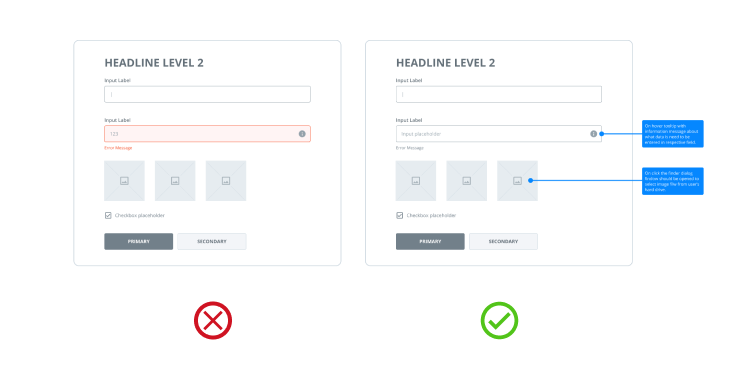
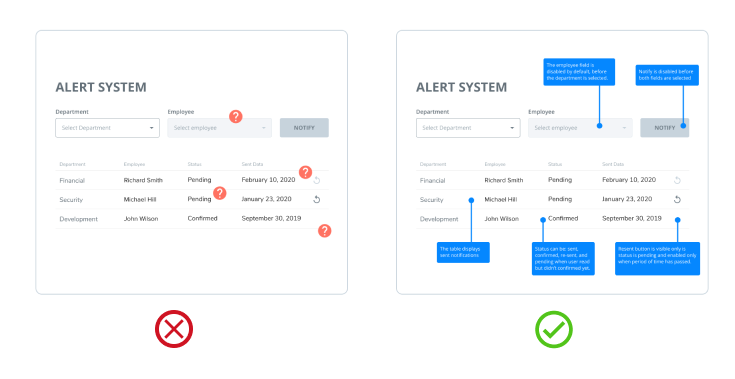
#5: Make notes or comments
Some design solutions may not be able to be visually illustrated, so stakeholders or developers may have questions about them. For example, the logic behind some controls. In such cases, you can provide on-screen annotations to explain the logic. This will help your team understand your solutions, saving you time from having to discuss them.
#6: Low to high-fidelity
There is no hard and fast rule. Sometimes, low-fidelity wireframes are best, while other projects may require high-fidelity ones. It all depends on the project. If you feel the need to add more details to the wireframes, don't hesitate to do so. However, according to Eric Ries' book, The Lean Startup, don't do extra work that doesn't bring value. Start with the basics and then add details as needed. For example, if you need to draw the developers' attention to a particular custom solution, then add more details to illustrate it in your wireframes.
#7: Create a prototype from the wireframe
As designers, we work with different products. Some have simple, common interactions, while others have more advanced ones. Wireframes alone may not be enough to illustrate complex, uncommon interfaces. Rather than writing lengthy notes and spending hours explaining them, you can extend your wireframes into interactive prototypes.
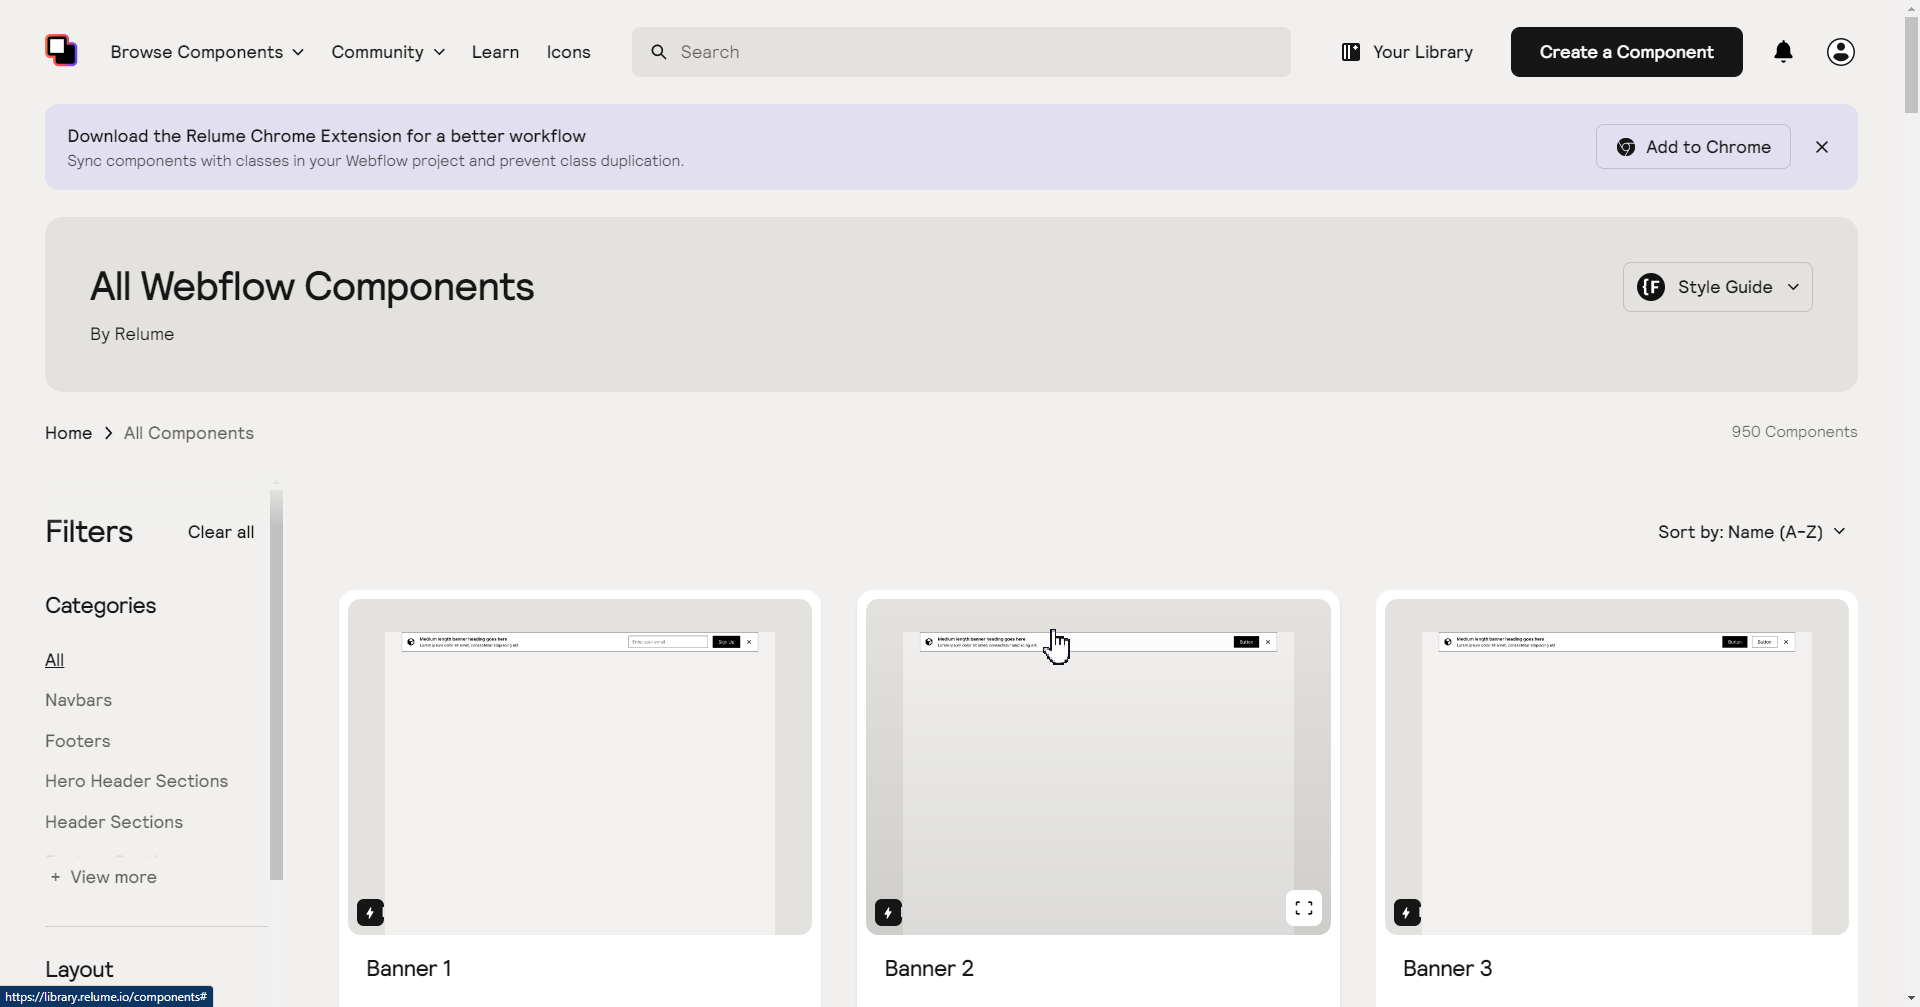
Design Process
Today, we are using no-code tools to review, design wireframes and create simple prototypes. From Figma to Webflow, watch how we work on our projects:
How-to:
- Download Relume Library Figma Kit for Figma build
- Design your wireframe
- Once done, download the Relume Chrome Extension for a better workflow
- Open Relume Library components for quick build to Webflow
- Build your prototype on Webflow

Up to 50% Subsidisies on your next implementation strategy with us
For Companies registered and operating in Singapore, with up at least 30% local shareholding - leverage on the Enterprise Development (EDG) grants for your next; Strategy, Implementation or Enablement project with us at Devhaus!
Supporting Asia’s teams - from all shapes and size


Frequently Asked Questions
Here are some pointers, and a little - 'Quick bite-sized information'.
A: The choice depends on your current stage and specific needs:Alpha ($15K) - If you need to validate a new idea, conduct market research, or develop a go-to-market strategy before building anything
Beta ($25K+) - If you're ready to build an MVP, new website, or CMS with user-focused design and basic analytics
Gamma ($50K+) - If you have an existing system that needs growth acceleration, marketing automation, or enhanced analytics
Delta ($200K+) - If you're undertaking comprehensive digital transformation with legacy system modernization
Epsilon ($30K+) - If you have existing systems (preferably built by us) that need performance optimization and technical debt reductionNot sure? Book a free 30-minute consultation with Rohan (rohan@admiralsystems.io) to discuss your specific situation and get a tailored recommendation.
Our pricing is completely transparent with fixed-scope packages:
What's Included:
- Dedicated team of 3-5 specialists per engagement
- All deliverables listed in the engagement model
- Comprehensive enablement documentation
- Project management and regular progress reports
- Up to the maximum man-hours specified (200-1,200 hours depending on engagement)
No Hidden Costs Policy:As long as your project stays within the agreed scope and timeline, there are no additional charges
- All potential add-ons are clearly listed upfront with fixed pricing
- For Singapore companies: EDG grants can cover 50-70% of costs (we handle the entire grant process)
When Additional Costs Apply:
- Scope changes beyond the original engagement (requires new engagement purchase)
- Client-caused delays that exceed allocated man-hours
- Optional add-ons you specifically request
Each engagement has a defined maximum timeline:
- Alpha: 2-8 weeks (200 hours)
- Beta: 8-12 weeks (280-500 hours)
- Gamma: 16-20 weeks (700 hours)
- Delta: 26-52 weeks (1,200 hours)
- Epsilon: 6-10 weeks (300 hours)
- Project Delays: We build buffer time into our estimates to account for normal client feedback cycles
( If delays are caused by our team, we absorb the additional costsIf delays are client-caused and exceed our allocated man-hours, additional charges may apply at our standard hourly ratesWe provide weekly progress reports so you always know where we stand)
- Acceleration Options: Rush delivery available with 50% surcharge for urgent needs
We can often compress timelines by adding additional team members! If you have your own development team, we're more than happy to take it up to hi-fi prototyping so it'll be a ton less work for your Dev team!
We can only guide you through it - having said that, we're experienced grant partners and handle the entire process:
Grant Coverage:
- Singapore SMEs: Up to 50% of project costs covered
- Sustainability projects: Up to 70% coverage (until March 2026)
- Our services align with multiple EDG categories: Business Strategy Development, Financial Management, Human Capital Development, and Strategic Brand & Marketing Development
Our Grant Process:
Partner Network: We work with Real Inbound Consulting (certified TR 43/SS 680) for grant administration
Full Service: Application preparation, document submission, project management, audit support, and claims processing
Administration Fees: $7,800-$15,000 depending on project size (much less than the grant savings)
Success Rate: High approval rate based on our experience with 50+ grant applications
Eligibility Requirements:
- Singapore-registered company30%+ local equity held by citizens/PRs
- Financially stable to complete the project
- Project hasn't commenced before application
Timeline: Grant approval typically takes 4-6 weeks before project commencement.
We offer multiple post-engagement options:
Immediate Post-Completion:
- 30-day warranty period for any bugs or issues
- Complete handover documentation and training
- Knowledge transfer to your internal team
Ongoing Support Plans:
Starting from
Basic ($5K/year): 40 hours, bi-annual check-ins, basic troubleshooting
Advanced ($10K/year): 80 hours, quarterly check-ins, strategy sessions
Premium ($20K/year): 120 hours, monthly check-ins, dedicated account manager
Growth & Evolution:New Requirements: Purchase additional engagement models for new projects
System Expansion: Beta → Gamma → Delta progression path available
Continuous Optimization: Epsilon engagements for ongoing performance improvements
Key Principle: Support covers maintenance and optimization of existing systems, but new features or integrations require new engagement models to ensure proper scoping and quality.
Key differentiators set us apart:
1. Asian Market Expertise:
- First Webflow Enterprise partner in Asia
- Deep understanding of Singapore, Hong Kong, and Indonesian markets
- Multi-language, multi-currency, cross-border commerce experience
2. Comprehensive MarTech Integration:
- Partners with 15+ best-in-class platforms (Segment, Customer.io, Fullstory, etc.)
- End-to-end data pipeline orchestration (not just point solutions)
- Unified dashboard approach preventing "tool sprawl"
3. Award-Winning Creative + Technical Team:
- 2024 Fullstory Service Partner Award winner (APAC)
- Design team that creates "jaw-dropping creatives" alongside technical implementation for your analytics
- Creative-technical convergence in every project